10 Steps on How to Install a Hybrid Alarm System
1. Plan the System Layout
Assess the Property: Identify the areas that need protection (doors, windows, high-traffic areas). Consider where wired and wireless components will be most effective.
Determine Sensor Locations: Decide where to install the wired and wireless sensors. Wired sensors are ideal for permanent or difficult-to-reach locations, while wireless sensors work well in areas where running cables is impractical.
Plan Cable Routes: If using wired components, determine the best routes to run cables from the sensors to the control panel. Plan for minimal cable exposure and easy access.
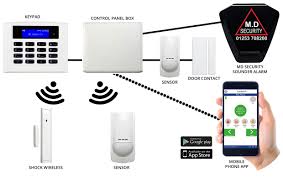
2. Install the Control Panel
Choose a Location: Install the control panel in a central, secure location, preferably near a power source and your main entry point. It should also be close to your router if connecting to the internet.
Mount the Control Panel: Use the provided brackets and screws to mount the control panel securely to the wall.
Connect Power: Plug the control panel into a power outlet. If it supports battery backup, install the batteries as per the manufacturer’s instructions.
3. Install Wired Sensors
Mount Wired Sensors: Install wired sensors (e.g., door/window sensors, motion detectors) in their designated locations. Drill holes and secure them with screws.
Run Cables: Run the cables from each sensor to the control panel. Use cable clips or conduits to secure the cables and keep them out of sight.
Connect to Control Panel: Strip the cable ends and connect them to the appropriate terminals on the control panel according to the manufacturer’s instructions.
Test Wired Sensors: Once connected, test each wired sensor to ensure they are functioning correctly and that the control panel registers their signals.
4. Install Wireless Sensors
Mount Wireless Sensors: Place wireless sensors in areas where you need flexibility or where wiring is not feasible. These might include smoke detectors, additional motion sensors, or security cameras.
Install Batteries: Insert batteries into each wireless sensor according to the manufacturer’s instructions.
Pair with Control Panel: Follow the manufacturer’s instructions to pair each wireless sensor with the control panel. This usually involves activating the sensor and pressing a button on the control panel.
Test Wireless Sensors: After pairing, test the wireless sensors to ensure they communicate effectively with the control panel.
5. Install Sirens and Alerts
Wired Sirens: Install wired sirens where they will be most effective (e.g., near entry points or in central areas). Connect the sirens to the control panel using the appropriate wiring.
Wireless Sirens: Place wireless sirens in strategic locations. Pair them with the control panel following the same process used for wireless sensors.
Test Sirens: Trigger the alarm system to ensure that the sirens activate and are loud enough to be heard throughout the property.
6. Connect to the Network
Ethernet Connection: If your control panel supports it, connect it to your home or business network using an Ethernet cable. This allows for remote monitoring and alerts.
Wi-Fi Connection: If using Wi-Fi, follow the instructions to connect the control panel to your wireless network.
7. Configure the System
Access the Control Panel Interface: Use the control panel’s interface, a connected monitor, or a mobile app to configure the system settings.
Set Up Zones: Define the zones (areas) covered by each sensor, and set up rules for how the system should respond to breaches (e.g., alarm, notification).
Set Alarm Modes: Configure different modes for the system, such as “Home,” “Away,” and “Night,” each with different levels of sensitivity and active zones.
Enable Notifications: Set up notifications to alert you via SMS, email, or a mobile app when the system detects a breach.
8. Test the System
Perform a Full System Test: Arm the system and test each sensor and siren. Simulate breaches (open a door, trigger a motion detector) to ensure that the system responds correctly.
Check Remote Access: If your system supports remote access, test it from your smartphone or computer to ensure you can monitor and control the system when away from the property.
9. Secure and Finalize Installation
Secure Cables: Ensure all cables are securely fastened and out of reach to prevent tampering.
Label Components: Label the zones or sensors in the control panel interface for easy identification.
Educate Users: Teach all household members or employees how to use the system, including how to arm/disarm and what to do if the alarm is triggered.
10. Maintenance and Monitoring
Regular Checks: Periodically test the system to ensure all components are functioning correctly. Replace batteries in wireless sensors as needed.
Update Software: If applicable, keep the control panel’s software updated to benefit from security patches and new features.
Monitor Activity: Regularly check the system logs and any connected cameras to ensure everything is secure.
For professional alarm installation services contact us via +254706731791.
Top Best Alarm Systems Installation Services in Kenya.
Other services you may consider checking.
Top Best CCTV Installation Services in Kenya.
Top Best Electrical Services in Kenya.
Top Best Phone Repair Services in Kenya.
Top Best TV Repair Services in Kenya.
Top Best Laptop Repair in Kenya.